In this blog post we will learn How to Install Samba Server on Rocky Linux and AlmaLinux with detailed steps followed by testing it with Linux and Windows Client.
Introduction
Samba is a well-known open-source file-sharing program that enables users to share network resources needed to do their activities. It is a re-implementation of the widely used network file and print sharing SMB (server message block) protocol. Shared resources are stored and accessible from a Linux or Windows client when Samba is installed on a central Linux server.
Pre-requisite
- Host installed with Rocky Linux 8 or 9. You may also have the AlmaLinux 8 or 9. Refer How to install Rocky Linux
- User with sudo privileges
- Windows client node.
Host preparation
To get started, first make sure that all of the packages are the most recent versions and that our server is up to date. Use the following command to do this.
$ sudo dnf -y updateReboot your system if the upgrades included the kernel packages
$ sudo rebootInstalling Samba Server
The default package repositories for Alma/Rocky Linux contain the samba packages. Run the given command to install them.
The command installs the dependencies shown in the output together with the packages that were requested. When the installation is finished, you will receive a list of all the packages that were installed successfully.
$ sudo dnf install samba samba-common samba-client -ySamba User and Group Creation
Samba allows for both public and private shares, with unrestricted access to the shares. We will set up Samba in this part such that it shares a secure directory that is accessible to authorized users only.
Create a user for the samba
$ sudo useradd smbuserSet a password for the user
$ sudo smbpasswd -a smbuserThe newly established group will then have the new Samba user added to it, as indicated:
$ sudo groupadd smb_group
$ sudo usermod -g smb_group smbuser
A samba share is a directory that network client computers will share. As a result, we will establish a directory as indicated.
$ sudo mkdir -p /home/admin/shareTo make the directory we just made accessible, we will now grant it ownership and permission.
$ sudo chmod -R 770 /home/admin/share
$ sudo chown -R root:smb_group /home/admin/share
$ sudo chcon -t samba_share_t /home/admin/share
Samba Configuration
Now its time to configure the samba default configuration file. We will have a backup of original file in case if something goes wrong we should be able to restore back.
$ sudo cp /etc/samba/smb.conf /etc/samba/smb.conf.bkNow let us open the file in the editor
$ sudo vim /etc/samba/smb.confTo control who has access to the Samba share, add the following settings to the configuration file.
[global]
        workgroup = WORKGROUP
        server string = Samba Server %v
        netbios name = samba-server.example.com
        security = user
        map to guest = bad user
        dns proxy = no
[Private]
        path = /home/admin/share
   valid users = @smb_group
        browsable =yes
        writable = no
        guest ok = no
Save and exit the file once you its completed.
Verify the configuration file using the below command
$ sudo testparmAllow the Firewall
Allow the Samba protocol on the firewall in order to allow remote machines to access samba shares.
$ sudo firewall-cmd --permanent --add-service=samba
$ sudo firewall-cmd --reload
Enable & restart the Service
Let us enable and start the Samba Services
$ sudo systemctl start smb
$ sudo systemctl start nmb
$ sudo systemctl enable smb
$ sudo systemctl enable nmb
Accessing SAMBA from Linux Client
The Samba client application has to be installed in order for a Linux client to access the file system. To install the software on your Linux machine, use the following command:
$ sudo dnf install samba-client -yAccess the share using the below command and authenticate using the credentials of the Samba user.
$ sudo smbclient -L //server-ip-or-hostname/PublicAccessing SAMBA from Windows Client
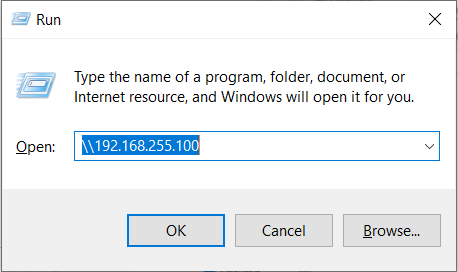
Press the Windows Key + R on a Windows client to bring up the Run dialog and access the share from this destination.
In the designated space, type your server’s IP address or hostname as follows:
To access the folder, you will have to authenticate using the credentials of the Samba user. After entering the user’s password and username from the previous step, click “OK.” You will now see the Folders in the share where you can read write as per your requirements.
Conclusion
After following this tutorial, you now know how to install Samba server on Rocky Linux and AlmaLinux followed by accessing it from Linux as well as Windows Client. For more details refer to Official Samba