Let us learn today how to set up SSH passwordless Login in Linux using the ssh-keygen utility. One of the greatest methods for managing activities like remote server access and management, file synchronization, and automatic backups is SSH. An asymmetric encryption technique called SSH passwordless login uses a set of public and private keys for authentication. Only clients presenting their private keys may establish a connection to the server, which has the public key.
Pre-requsite
To have the passwordless SSH authentication we will need atleast two machines. In this blog we will be using two two machines installed with Rocky Linux. Refer : How to install Rocky Linux
- Server A : 192.168.255.126 with user labuser
- Server B : 192.168.255.129 with user labuser
Generate SSH key pair
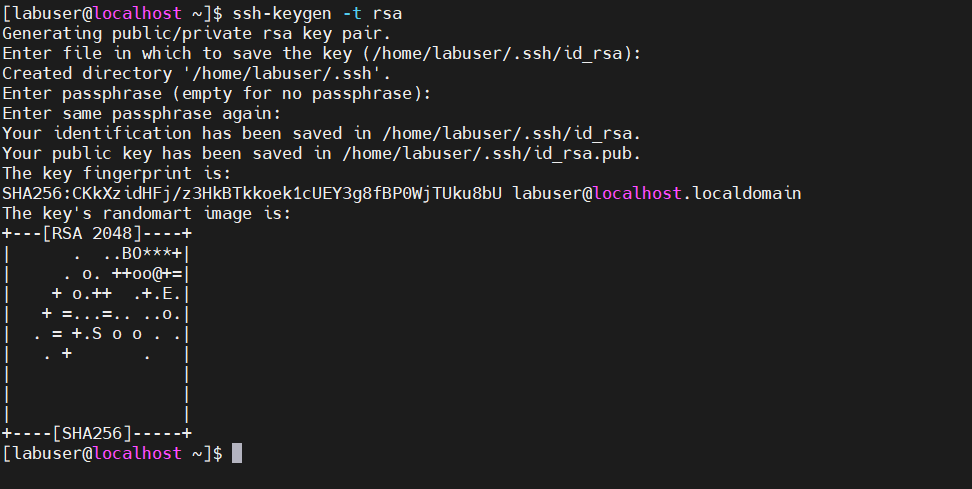
On the Server A , 192.168.255.126 use ssh-keygen to create a key pair made up of a public key and a private key.
ssh-keygen -t rsaThis generates a 2048-bit RSA key pair by default, which is thought to be safe enough to encrypt communication between the client and the distant host.
Alternatively, you may give the -b option as follows to generate a bigger and more secure 4096-bit key pair:
ssh-keygen -b 4096Following the execution of the ssh-keygen command, a set of questions will appear. The file in which the keys will be saved must be provided first. The keys are automatically stored in your home directory’s ~/.ssh directory. Although you may provide your own file, we’ll use the defaults in this example.
Thus, hit ENTER to save the keys in your home directory’s ~/.ssh directory.
You will then be asked to enter a passphrase. This step, which is optional, adds an extra degree of security to prevent unauthorized users from utilizing the keys for authentication. If your goal is to set up passwordless SSH authentication between your local system and other remote systems, you can, however, leave this field empty.
For now, we will leave this blank and press ENTER.
Ultimately, the public and private keys of the SSH key pair will be kept on your local machine under the designated route. This is the result of a command that was executed successfully.
The SSH keys are stored in your home directory’s ~/.ssh directory when using the default settings. Use the following command to verify this:
$ ls -la ~/.sshOutput

- id_rsa is the private key, needs to be kept private and hidden. Giving in to it might result in a significant hack of your remote server.
- id_rsa.pub – The public key which is to be stored on the remote host you wish to connect to.
Create SSH directory on server
Login to the Server B (192.1658.255.129) to which you wish to connect from Server A. Try listing the files inside the.ssh directory to determine whether it already exists:
ls .sshIn the event that it doesn’t, you should create that directory instead of moving into it:
mkdir -p .sshCopy SSH Public Key to remote server
From the Server A run the below command to upload the public key to Server B . The public SSH key may be copied to a remote computer with ease and convenience using the ssh-copy-id command.
$ ssh-copy-id labuser@192.1658.255.129Replace the labuser with your own use and the IP with that of yours remote server
The output will appears as if this is your first time connecting to the host is as follows. Type “yes” and press ENTER to continue. Provide the password to for “labuser” of Server B complete the copying of the keys.
Disable Password Authentication
The configuration of SSH public-key authentication has been accomplished. But password authentication is still in effect, thus brute force assaults can still target your remote host.
It is thus highly advised to turn off password authentication. Login to Server B (192.168.255.129) . Next, access the configuration file named sshd_config.
$ sudo vim /etc/ssh/sshd_configFind the PasswordAuthentication directive by swiping down. Remove the comments and change it to “no” if it is commented out.
PasswordAuthentication noSave the file followed by restart of SSH service
$ sudo systemctl restart sshdThe remote server no longer accepts SSH password authentication, thus public-key authentication is the only method left for gaining access to the remote server.
Test passwordless SSH connection
Now that you have uploaded the public key to the remote server 192.168.255.129 we are now ready to test the passwordless SSH from the Server A (192.168.255.126). Login to the Server A and try connecting to server B with below commands
# ssh labuser@192.168.255.129You may see Output similar to the below ones with a Login banner. You will not be prompted for any password and will be logged in Server B
[labuser@localhost ~]$ ssh labuser@192.168.255.129

Warning: Permanently added '192.168.255.129' (ED25519) to the list of known hosts.

Notice: The use of this system is restricted to users who have been granted access and authorization by LinuxQuery. Your use of this system constitutes your express consent to LinuxQuery's monitoring, recording and auditing of all system activities as permitted by law. Your unauthorized use of this system, or any unauthorized disclosure or use of the contents of this system by you, may be subject to company disciplinary actions and/or criminal and civil penalties.


Last login: Mon Feb  5 11:26:34 2024 from 192.168.255.126

[labuser@localhost ~]$
Conclusion
Finally you are able to establish a Passwordless SSH login between two Linux nodes with step-by-step turorial. . Instructions are supplied for current client PCs running Rocky Linux. These commands should function on most Linux distributions. Learn more about SSH on OpenSSH